> For the complete documentation index, see [llms.txt](https://docs.easycalling.easyplatform.app/llms.txt). Markdown versions of documentation pages are available by appending `.md` to page URLs; this page is available as [Markdown](https://docs.easycalling.easyplatform.app/getting-started/quick-start-guide.md).
# 5-Minute Quick Start
Get up and running with Easy Calling in 5 minutes
**Welcome!** This guide gets you from zero to handling your first call in just 5 minutes. Let's go!
## What You'll Learn
By the end of this guide, you'll know how to:
* Access Easy Calling in Microsoft Teams
* See incoming calls and caller information
* Answer, transfer, or send calls to voicemail
* View your call history
* Take quick actions after a call
***
## Step 1: Open Easy Calling (30 seconds)
**Where is it?** Easy Calling lives right inside Microsoft Teams.
1. Open **Microsoft Teams** (desktop or web)
2. Look for the **Apps** icon in the left sidebar (it looks like a grid of squares)
3. Search for **"Easy Calling"**
4. Click to open
**Pro Tip:** Pin Easy Calling to your sidebar for instant access. Right-click the app icon and select "Pin."
Pin Easy Calling to your Microsoft Teams sidebar for one-click access
***
## Step 2: Understand Your Dashboard (1 minute)
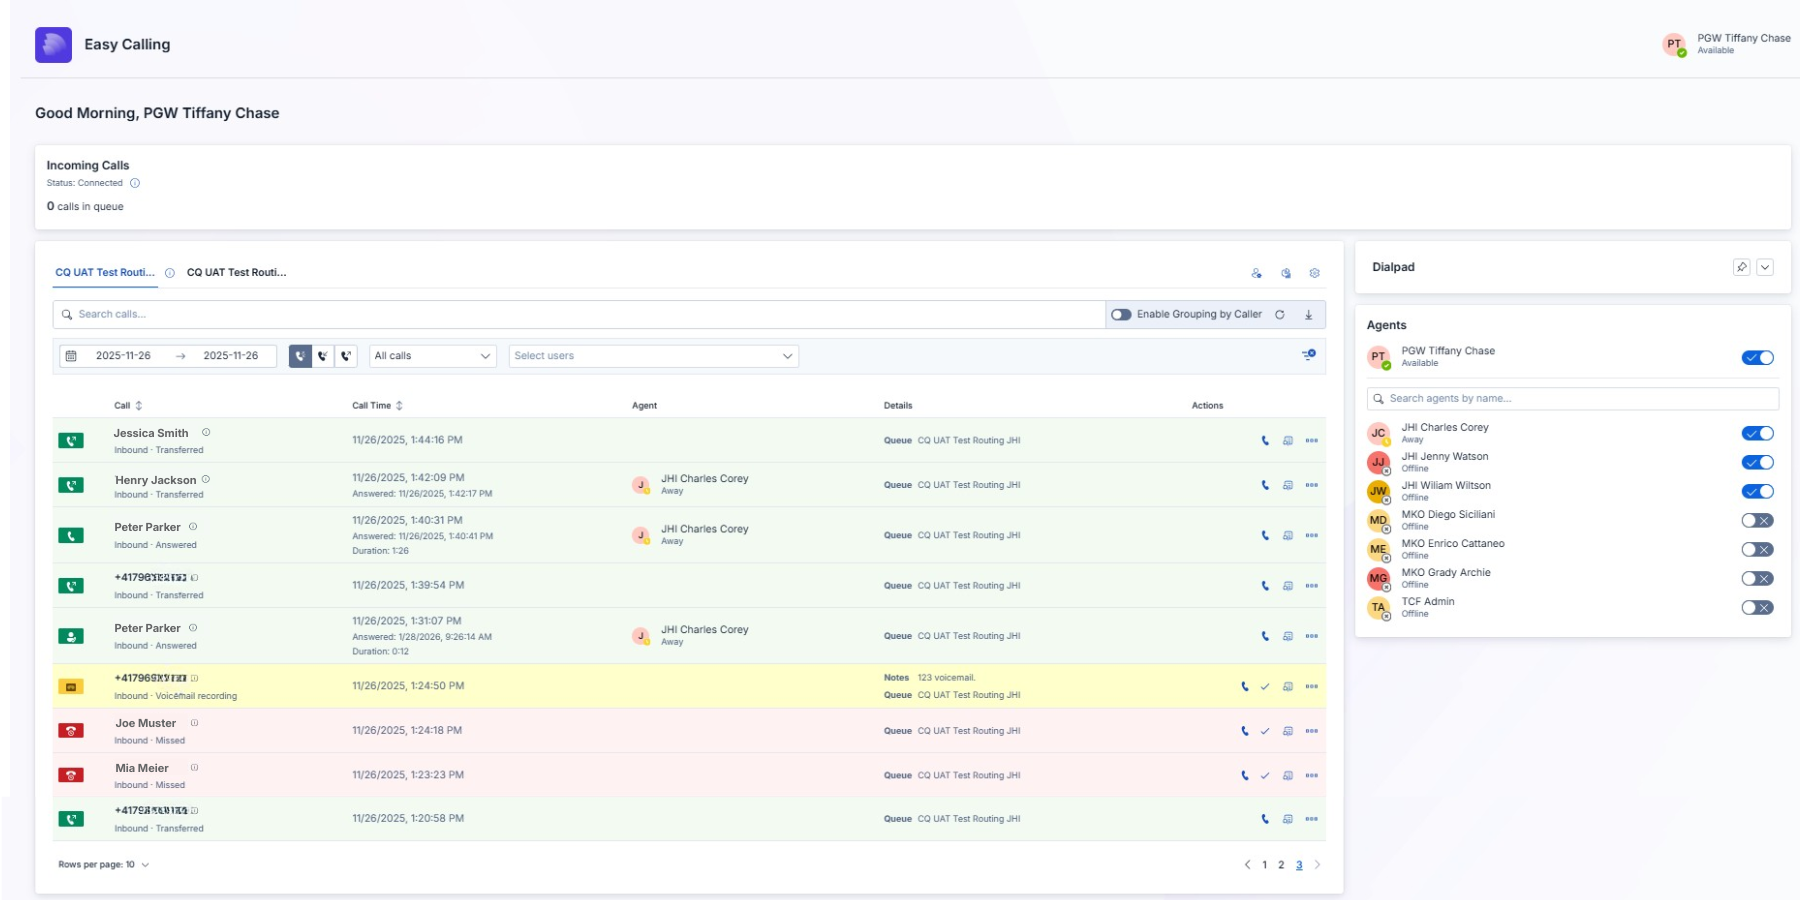
**What am I looking at?** Your Easy Calling dashboard has three main areas:
### Incoming Calls (Top Section)
Shows all calls currently ringing or waiting in queue. You'll see:
* **Caller's name/number** (if available in your directory)
* **Which queue** the call came through
* **How long** they've been waiting
* **Quick action buttons** (View Details | Request Call | Direct Transfer | Transfer to Voice App | Reject Call | Force Cleanup)
### Call History (Middle Section)
Your complete call log with color-coded indicators:
* **Green** = Answered calls
* **Red** = Missed calls
* **Yellow** = Voicemail left
### Team Status (Agent Panel)
See which team members are:
* Available (green)
* Away (yellow)
* On a call / busy (red)
* Offline or opted out (gray)
***
## Step 3: Handle Your First Call (2 minutes)
**A call is coming in! What do I do?**
### Option 1: Answer the Call
1. When a call appears in your dashboard, you'll see a **notification** in Microsoft Teams
2. Click the **"Answer"** button (or answer directly from the Microsoft Teams notification)
3. The caller information appears on your screen
4. **That's it!** You're now on the call
**What you'll see during the call:**
* Caller's name, number, and company (if available)
* Call duration timer
* Notes section (type notes that save automatically)
* Quick action buttons
### Option 2: Transfer the Call
Not the right person for this call? No problem.
1. Click the **"Transfer"** button on the incoming call card
2. Choose either:
* **Direct Transfer** → Select a specific person
* **Transfer to Voice App** → Send to another call queue
3. Click **"Transfer"**
4. The call is routed immediately – no awkward "let me transfer you" delay
### Option 3: Send to Voicemail
Can't answer right now? Send it to voicemail.
1. Click the **"Send to Voicemail"** button on the call card
2. The caller hears your voicemail greeting
3. You get a notification when they leave a message
4. Listen to the voicemail later from your call history
***
## Step 4: After the Call (1 minute)
**The call ended. Now what?** Easy Calling makes follow-up effortless.
When a call ends, you'll see the call appear in your **Call History** with these quick actions:
### Send an Email
Click the **envelope icon** to send a follow-up email to the caller – it pre-fills their email address if available.
### Create a Task
Click the **task icon** to create a reminder in:
* **Microsoft Planner** (shared team tasks)
* **Microsoft To-Do** (your personal task list)
The task automatically includes the caller's information and call notes.
### Save as Contact
Click the **person icon** to save the caller to your personal contacts–perfect for recurring callers.
### Listen to Voicemail
If they left a voicemail, click the **play icon** to listen.
***
## Step 5: Explore Your Call History (30 seconds)
**Need to find a past call?** Your call history is powerful.
1. Navigate to the **"Call History"** section
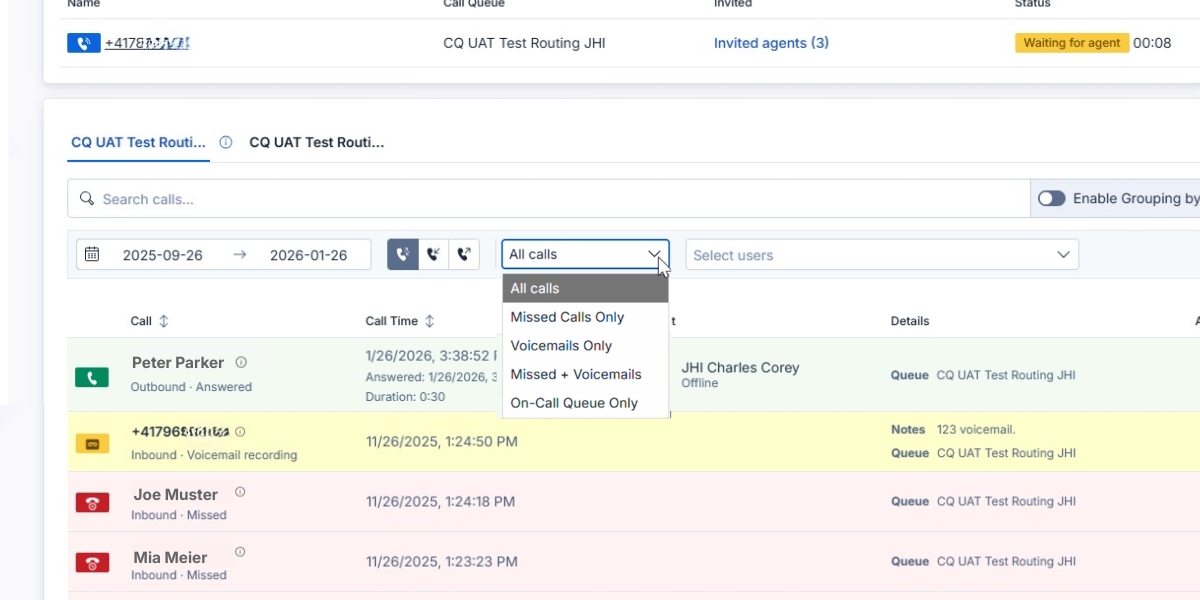
2. Use the **filters** at the top:
* Filter by date range
* Show all calls
* Show only missed calls
* Show only voicemails
* Show missed calls + voicemails
* Show On-Call queue only
3. Click any call to see full details, notes, and available actions
**Pro Tip:** Use the **search bar** to find calls by name, number, or even keywords in your notes.
Filter your call history to find exactly what you need
***
## Quick Tips for Success
### Do This Right Away
* **Pin Easy Calling** to your Microsoft Teams sidebar (right-click → Pin)
* **Turn on notifications** in Microsoft Teams settings so you never miss a call
### Level Up Your Skills
* **Add notes during calls** so follow-ups are easier
* **Check call history daily** to ensure no missed calls slip through
### Common Questions
**Q: What if I don't want to receive calls right now?** **A:** You can opt-out of the call queue – see [Call Management ](/feature-categories/call-management.md)(7. Agent Opt-in/Opt-out)
**Q: Can I use Easy Calling on my phone?** **A:** Yes! Easy Calling works in the Teams mobile app and as a standalone web app – see [Progressive Web App Guide](/getting-started/progressive-web-application-and-agent-overview.md)
**Q: What if I accidentally decline a call?** **A:** No worries! The call returns to the queue and another agent can answer, or it goes to voicemail if no one's available.
***
## What's Next?
Now that you know the basics, explore these guides to become an Easy Calling pro:
* [**Best Practices – Call Life Cycle**](/getting-started/best-practices-call-life-cycle.md) – Step-by-step guide for handling calls
* [**Day in the Life: Contact Center Agent**](/user-guides/contact-center-agent.md) – See how agents use Easy Calling all day
* [**How-To Guides**](/features-and-how-to/easy-calling-in-microsoft-teams.md) – Master specific features like transfers, voicemail, and more
* [**Tips & Tricks**](/user-guides/tips-and-tricks.md) – Work smarter, not harder
***
## Need Help?
* [**Frequently Asked Questions**](/troubleshooting-and-support/faqs.md) – Quick answers
* [**Contact Support**](/troubleshooting-and-support/support.md) – We're here to help
**You're ready to start!** Open Easy Calling and handle your first call with confidence.